vite创建项目
- 1.安装Node:Vite 需要 Node.js 版本 >= 12.0.0。
2.然后执行:npm init vite@latest
创建vite+vue项目
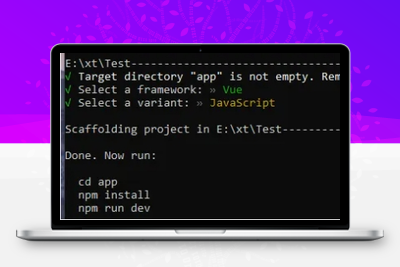
- 在命令行输入以下创建语句。然后根据下图所示,输入项目名称并选择vue框架
npm init vite@latest
npm init vite@latest![图片[1]-Vue3 基础第一篇-智码星河](https://wx234.cn/wp-content/uploads/2024/10/20241027152836124-1.jpg)
创建完项目后,根据提示依次输入三条命令:
1.cd 项目名称
2.npm install
3.npm run dev
![图片[2]-Vue3 基础第一篇-智码星河](https://wx234.cn/wp-content/uploads/2024/10/20241027152859650-2.jpg)
![图片[3]-Vue3 基础第一篇-智码星河](https://wx234.cn/wp-content/uploads/2024/10/20241027152914954-3.jpg)
到此即可预览项目了,但是少一些东西...
接下来需要安装less,router,vuex,因为默认创建的项目这些都没有,需要自己安装
安装less:
npm i less less-loader --save-dev就可直接使用了:
![图片[4]-Vue3 基础第一篇-智码星河](https://wx234.cn/wp-content/uploads/2024/10/20241027153031512-5.jpg)
安装router:
npm install vue-router --save在src目录下,新建pages文件夹,用来放页面,这里创建2个页面,home和about:
![图片[5]-Vue3 基础第一篇-智码星河](https://wx234.cn/wp-content/uploads/2024/10/20241027153107153-6.jpg)
在src目录下,新建router文件夹,里面index.js,然后写入下面代码:
// createRouter用来新建路由实例,createWebHashHistory用来配置我们内容使用hash的模式(也就是路径上会通过#来区分)
import { createRouter, createWebHashHistory } from 'vue-router'
import Home from '../pages/home.vue'
import About from '../pages/about.vue'

const routes = [
  {
    path: '/',
    name: 'Home',
    component: Home
  },
  {
    path: '/about',
    name: 'About',
    component: About
  }
]

const router = createRouter({
  history: createWebHashHistory(),
  routes
})

export default router
main.js里修改为(直接替换原来的):
import { createApp } from 'vue'
import App from './App.vue'
import './style.css'
import router from './router/index'
createApp(App)
    .use(router)
    .mount('#app')
app.vue要添加路由占位符:
<template>
    <router-view></router-view>
</template>

<script setup>
</script>

<style scoped>
</style>
到此:在地址栏输入路由path,即可看见页面跳转
编程式导航:
<template>
  <h3>home</h3>
  <button @click="about">关于</button>
</template>

<script setup>
    // 先得引入这两个路由函数
    import { useRouter, useRoute } from "vue-router";
    // 接收函数返回的东西
    const $router = useRouter(); // 跳转
    const $route = useRoute(); // 拿到路由信息(这里没用到)

    let about = () => {
        console.log("about");
        $router.push({ path: "/about" });
    };
</script>
到此,就可以开始写项目了。
vue3使用ElementUI:
安装
npm install element-plus --savmain.js添加:
import { createApp } from 'vue'
import App from './App.vue'
import './style.css'

import ElementPlus from 'element-plus'
import 'element-plus/dist/index.css'

import router from './router/index'
createApp(App)
    .use(router)
    .use(ElementPlus)
    .mount('#app')
使用:
<template>
  <h3>home</h3>
  <button @click="about">关于</button>

  <el-row class="mb-4">
    <el-button>Default</el-button>
    <el-button type="primary">Primary</el-button>
    <el-button type="success">Success</el-button>
    <el-button type="info">Info</el-button>
    <el-button type="warning">Warning</el-button>
    <el-button type="danger">Danger</el-button>
  </el-row>

</template>![图片[6]-Vue3 基础第一篇-智码星河](https://wx234.cn/wp-content/uploads/2024/10/20241027153411748-7.jpg)
使用axios请求:
安装axios:
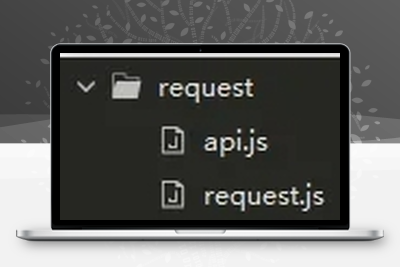
npm install axios -g封装axios:
使用(在onMounted里发请求):
<template>
 <h3>about</h3>
 {{ data.arr }}
</template>

<script setup>
    import { GetHomeData } from '../request/api.js'  //导入接口
    import {ref,reactive,onMounted} from "vue"

    // data数据
    const data = reactive({
        arr: [],
    });

    // onMounted 里请求数据
    onMounted(()=>{
        GetHomeData().then(res=>{
            console.log(res.data.data);
            data.arr = res.data.data.brandList
        })
    })
</script>

<style scoped>
</style>![图片[7]-Vue3 基础第一篇-智码星河](https://wx234.cn/wp-content/uploads/2024/10/20241027154620742-7.jpg)
本站代码模板仅供学习交流使用请勿商业运营,严禁从事违法,侵权等任何非法活动,否则后果自负!
WX234.CN


暂无评论内容